[toc]
JUC
JUC是啥 / 为什么要用JUC

image-20200903222641670
JUC是在线程的基础上 为了高效解决并发问题 并且充分利用cpu
并发: 多个线程操作一个共同资源 – cpu, 模拟出来多个线程, 只要切换执行的快 那就是牛逼!!!! (本质是交替执行)
并行: 和串行相反 大家并排一起走 – 多核cpu
java
1
2
|
System.out.println(Runtime.getRuntime().availableProcessors());
|
image.png
线程的基础
可以看这里
LOCK锁
例子:
java
1
2
3
4
5
6
7
8
9
10
|
private Lock lock = new ReentrantLock();
lock.lock();
try {
} catch (Exception e) {
e.printStackTrace();
} finally {
lock.unlock();
}
|
使用过程:
- 创建锁的实例
- 加锁
- finally中释放锁
Synchronized和Lock
P6、Synchronized和Lock区别
生产者 / 消费者
在java线程中 利用 synchronized/wait/notify 实现了
Condition 精准通知和唤醒线程
Condition: 和obj 的wait notify notifyall 有对应方法
一个Condition 实例本质上绑定到一个锁.
– 利用Condition 实现精准唤醒
java
1
2
3
4
5
6
7
8
9
10
11
12
13
14
15
16
17
18
19
20
21
22
23
24
25
26
27
28
29
30
31
32
33
34
35
36
37
38
39
40
41
42
43
44
45
46
47
48
49
50
51
52
53
54
55
|
public class App {
public static void main(String[] args) {
DataClass dataClass = new DataClass();
new Thread(() -> {
for (int i = 0; i < 10; i++) {
dataClass.change1();
}
}, "A").start();
new Thread(() -> {
for (int i = 0; i < 10; i++) {
dataClass.change2();
}
}, "B").start();
new Thread(() -> {
for (int i = 0; i < 10; i++) {
dataClass.change3();
}
}, "C").start();
}
}
class DataClass {
private Lock lock = new ReentrantLock();
private Condition condition1 = lock.newCondition();
private Condition condition2 = lock.newCondition();
private Condition condition3 = lock.newCondition();
private int number = 0;
public void change1() {
lock.lock();
try {
while (number != 0) {
condition1.await();
}
System.out.println(number + "::" + Thread.currentThread().getName());
number = 1;
condition2.signal();
} catch (Exception e) {
e.printStackTrace();
} finally {
lock.unlock();
}
}
public void change2() {
}
public void change3() {
}
}
|
锁: 锁是啥, 锁什么
对象锁:
就是锁对象: 每个对象一把锁
java
1
2
3
4
5
6
7
| 每对A进行一次对象创建 就新获取一把锁 所以 同一个对象的锁会阻塞
-------
class A{
public synchronized void method(){
}
}
|
类锁
就是锁对象: 每个对象一把锁
java
1
2
3
4
5
6
7
8
| 不管有多少个对象 只要是使用 static synchronized 锁 那就是同一把锁 就会阻塞
-------
class A{
public static synchronized void method(){
}
}
|
类锁和 对象锁没有直接关系 并不是通一把锁
现在有典型的八锁问题如果理解了就会很简单:
①两个普通同步方法,两个线程,标准打印, 打印? //one
②新增 Thread.sleep() 给 one() ,打印?//one
③新增普通方法 three() , 打印? //three one two
④两个普通同步方法,两个 Data对象,打印? //two one
⑤修改 one() 为静态同步方法,打印? //two one
⑥修改两个方法均为静态同步方法,一个Data对象? //one two
⑦一个静态同步方法,一个非静态同步方法,两个 Data对象? //two one
⑧两个静态同步方法,两个 Data对象? //one two
java
1
2
3
4
5
6
7
8
9
10
11
12
13
14
15
16
17
18
19
20
21
22
23
24
25
26
27
28
29
30
31
| public static void main(String[] args) throws InterruptedException {
Data date1 = new Data();
new Thread(() -> {
date1.one();
}).start();
TimeUnit.SECONDS.sleep(1);
new Thread(() -> {
date1.two();
}).start();
}
class Data {
public synchronized void one() {
try {
TimeUnit.SECONDS.sleep(3);
} catch (InterruptedException e) {
e.printStackTrace();
}
System.out.println("one");
}
public synchronized void two() {
System.out.println("two");
}
public void three() {
System.out.println("two");
}
}
|
读写锁
ReadWriteLock
读时可以多个线程同时读, 写的时候只有一个线程去写
独占锁: 读锁: 只允许一个线程持有锁
共享锁: 多个线程共享的一个锁
例子:
java
1
2
3
4
5
6
7
8
9
10
11
12
13
14
15
16
17
18
19
20
21
22
23
24
25
26
27
28
29
30
31
32
33
34
35
36
37
38
39
40
41
42
43
44
45
46
47
48
49
|
public class Demo {
public static void main(String[] args) {
Cache cache = new Cache();
for (int i = 0; i < 20; i++) {
final int temp = i;
new Thread(() -> cache.write(temp)).start();
}
for (int i = 0; i < 10; i++) {
final int temp = i;
new Thread(() -> cache.read(temp)).start();
}
}
static class Cache {
private volatile HashMap<String, String> cacacheMap = new HashMap<>();
private ReadWriteLock readWriteLock = new ReentrantReadWriteLock();
public void write(int i) {
try {
readWriteLock.writeLock().lock();
System.out.println("Thread:" + Thread.currentThread().getName() + "==写入" + i);
cacacheMap.put(i + "", i + "");
System.out.println("Thread:" + Thread.currentThread().getName() + "==成功" + i);
} finally {
readWriteLock.writeLock().unlock();
}
}
public void read(int i) {
readWriteLock.readLock().lock();
try {
System.out.println("Thread:" + Thread.currentThread().getName() + "==读" + i);
cacacheMap.get(i + "");
System.out.println("Thread:" + Thread.currentThread().getName() + "==成功读" + i);
} finally {
readWriteLock.readLock().unlock();
}
}
}
}
|
并发下的集合问题
COW写时拷贝
要了解一个思想 叫做 COW 即 写时拷贝 (copy - on - write)
计算机程序设计领域的一种优化策略;
当然也有 用读写分离的手法解决
List
- 众所周知, ArrayList是线程不安全的所以如果并发修改或者添加 就会产生并发修改异常(ConcurrentModifyException)
java.util.ConcurrentModificationException
java
1
2
3
4
5
6
7
8
|
List<String> list = new ArrayList<>();
for (Integer i = 0; i < 50; i++) {
new Thread(() -> {
list.add(UUID.randomUUID().toString().substring(0, 3));
System.out.println(list);
}, i.toString()).start();
}
|
解决办法:
java
1
2
3
4
5
6
7
|
源码:
public synchronized void addElement(E obj) {
modCount++;
ensureCapacityHelper(elementCount + 1);
elementData[elementCount++] = obj;
}
|
- 用一个集合工具类实现安全线程Collections.synchronizedXXX
java
1
| List<String> list = Collections.synchronizedList(new ArrayList<String>());
|
- 使用JUC的安全集合 CopyOnWriteAArrayLis();
java
1
2
3
4
5
6
7
8
9
10
11
12
13
14
15
|
public boolean add(E e) {
final ReentrantLock lock = this.lock;
lock.lock();
try {
Object[] elements = getArray();
int len = elements.length;
Object[] newElements = Arrays.copyOf(elements, len + 1);
newElements[len] = e;
setArray(newElements);
return true;
} finally {
lock.unlock();
}
}
|
Set
- collections的线程安全方法
- cowSet
map
set底层实现是根据Hashmap实现的 (key唯一, value 是一个固定的对象) map具体的实现方式
关于Hashmap
并发使用 ConcurrentHashMap
挖坑 为什么好用 实现方式 并发安全方式
Callable
java
1
2
3
| public interface Callable<V> {
V call() throws Exception;
}
|
类似于Runnable 其实例都是可能由另一个线程执行设计的.但是Callable 有返回结果<这个Type就是返回类型> 有一个异常
- Thread没有Callable接口的直接实现 要通过Runnable 的FutureTask 实现
java
1
2
3
4
5
6
7
8
9
10
11
12
13
14
15
16
17
18
| public class CallableDEmo {
public static void main(String[] args) throws ExecutionException, InterruptedException {
MYhread mYhread = new MYhread();
FutureTask<String> futureTask = new FutureTask<>(mYhread);
new Thread(futureTask, "222").start();
System.out.println(futureTask.get());
}
}
class MYhread implements Callable<String> {
@Override
public String call() throws Exception {
System.out.println(Thread.currentThread().getName() + "====Back");
return "back";
}
}
|
三个辅助类
CountDownLatch
一个倒计数工具
构造方法有一个int 数据
- countDown() 计数减一
- await() 调用此方法会让该当前线程等待 计数器直到计数器归零
CyclicBarrier
和上面的相反 是正向计数
构造方法 1. int a 2, int a, Runnable 线程
也有await方法 : 同一个线程内的方法
Semaphore 信号量
可以理解为限流 构造方法 有线程数
如果位置数量为3 线程数为6就需要排队
acquire() 获取/release() 释放
在 semaphore.acquire() 和 semaphore.release()之间的代码,同一时刻只允许指定个数的线程进入,其他线程等待
- CountDownLatch 是一次性的,CyclicBarrier 是可循环利用的
- CountDownLatch 参与的线程的职责是不一样的,有的在倒计时,有的在等待倒计时结束。CyclicBarrier 参与的线程职责是一样的
并发队列
阻塞队列
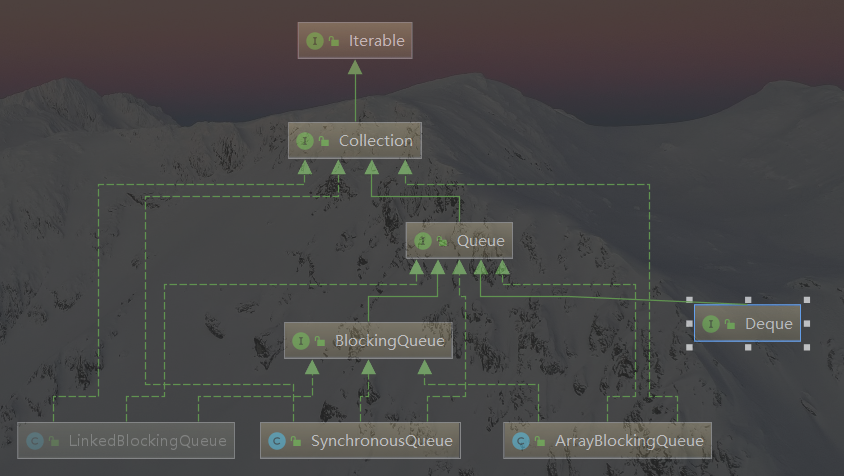
阻塞队列
四种不同应用场合的API
|
抛出异常 |
有返回值 |
阻塞 |
等待阻塞() |
| 添加 |
add |
offer |
put |
offer(E e, long timeout, TimeUnit unit) |
| 移除 |
remove |
poll |
take |
poll(E e, long timeout, TimeUnit unit) |
| 检测队首元素 |
element |
peek |
- |
- |
原理(待完成)
同步队列
线程池(重要)
池化技术(一种思想)
程序运行使用系统的资源. 对其优化 就使用池化技术
将资源创建好 需要的化就来取. 用完也不销毁 而是放回池子中
线程池, 连接池, 内存池, 对象池….
- 降低资源的消耗
- 提高响应的速度
- 方便统一管理 ……
==线程复用 , 可以控制更大的并发量 ,==
线程池的 四(五)个创建方法, 七大参数,四种策略
三个方法
线程池工具类: Exectors
newCachedThreadPool 灵活的创建一个可缓存的线程池,如果线程池长度超过处理需求,可灵活回收空闲线程,若无可回收,则新建线程newFixedThreadPool(int nThreads) 创建一个定长线程池,可控制线程最大并发数,***超出的线程会在队列中等待newScheduledThreadPool 创建一个定长线程池,支持定时及周期性任务执行newSingleThreadExecutor 创建一个单线程化的线程池
在阿里的开发者手册中提到线程池的创建建议
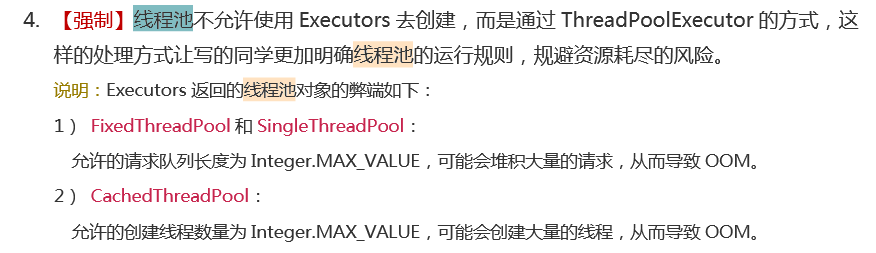
image.png
七个参数
上面四种创建方法都是用ThreadPoolExecutor创建的 所以可以直接用ThreadPoolExecutor来创建
java
1
2
3
4
5
6
7
| public ThreadPoolExecutor(int corePoolSize, // 核心线程大小
int maximumPoolSize, // 最大核心线程数
long keepAliveTime, // 超时时间设置
TimeUnit unit, // 单位
BlockingQueue<Runnable> workQueue, // 阻塞队列
ThreadFactory threadFactory, // 线程工厂
RejectedExecutionHandler handler)
|
蓝色正常不会打开 而需要时才会开启
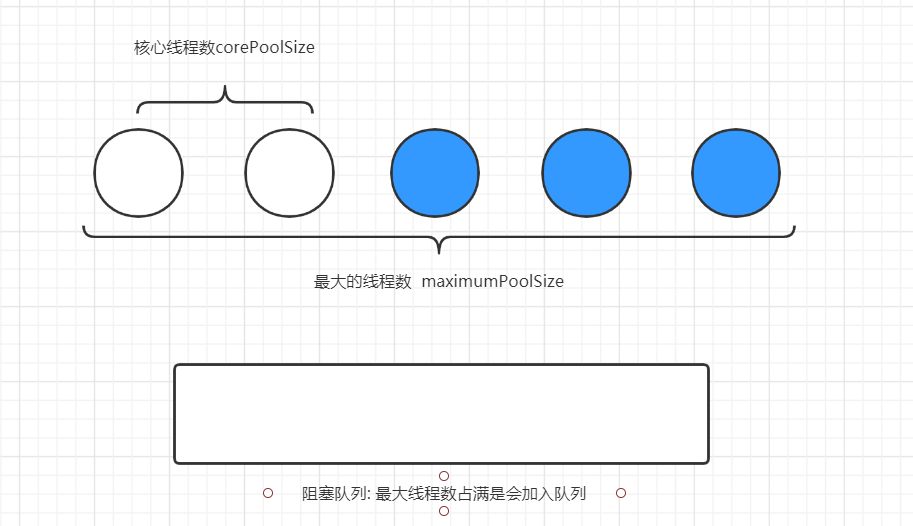
正常状态

拒绝策略
如果线程池和队列满了就会执行拒绝策略
四种拒绝策略
RejectedExecutionHandler 拒绝策略接口
- DiscardPolicy 默认的拒绝策略。直接抛出 java.util.concurrent.RejectedExecutionException异常
- CallerRunsPolicy 将任务返还给调用者线程执行
- DiscardPolicy 直接抛弃无法处理的任务,不予处理不抛异常。如果业务汇总允许任务丢失,这是最好的策略
- DiscardOldestPolicy 抛弃队列中等待最久的任务,然后把当前任务加入队列中尝试再次提交当前任务
线程池代码
java
1
2
3
4
5
6
7
8
9
10
11
12
13
14
15
16
17
18
19
20
21
22
23
24
25
26
27
28
29
30
31
32
33
34
35
36
37
38
39
40
41
| public class ThreadPoolTest {
private final int CORE_POLL_SIZE = 4;
private final int MAX_NUM_POLL_SIZE = 8;
private Long KEEP_ALIVWTIME = 20L;
private BlockingQueue workQueue = new ArrayBlockingQueue<>(8);
public ThreadPoolExecutor getThreadPoolExecutor() {
return threadPoolExecutor;
}
private ThreadPoolExecutor threadPoolExecutor = null;
public ThreadPoolTest() {
ThreadPoolExecutor pool = new ThreadPoolExecutor(
CORE_POLL_SIZE,
MAX_NUM_POLL_SIZE,
KEEP_ALIVWTIME,
TimeUnit.SECONDS,
workQueue,
Executors.defaultThreadFactory(),
new ThreadPoolExecutor.CallerRunsPolicy()
);
threadPoolExecutor = pool;
}
public static void main(String[] args) {
ThreadPoolTest threadPoolTest = new ThreadPoolTest();
ThreadPoolExecutor threadPoolExecutor = threadPoolTest.getThreadPoolExecutor();
for (int i = 0; i < 20; i++) {
int finalI = i;
threadPoolExecutor.execute(() -> {
System.out.println("当前:" + Thread.currentThread().getName() + "===" + finalI);
});
}
threadPoolExecutor.shutdown();
}
}
|
调优部分
如何定义这个最大的的线程数呢
- cpu密集型 : 几核就用几个最大线程数 cpu利用率最大
java
1
2
|
int processors = Runtime.getRuntime().availableProcessors();
|
- IO密集型: 大于 number(程序中十分消耗IO的线程数)的数量 (可以是number的两倍);
ForkJoin(大数据量)
将 大任务分解为多个小任务 然后进行处理 – 递归
工作窃取 利用(双端队列)
A, B 两个线程 A线程执行结束
B线程还有任务 A就窃取B的任务去处理
例子
- 通过forkjoinpool来执行
- 将任务 forkjoinpool.execute/forkjoinpool.submit(ForkJoinTask task(任务))
- 任务类 要继承 ForkJoinTask(RecursiveTask是其中一个子类)
java
1
2
3
4
5
6
7
8
9
10
11
12
13
14
15
16
17
18
19
20
| public class Demo extends RecursiveTask<Long> {
long temp = 10000L;
@Override
protected Long compute() {
if ((end - st) < temp) {
Long sum = 0L;
for (long i = st; i <= end; i++) {
sum += i;
}
return sum;
} else {
long l = st + (end - st) / 2;
Demo d1 = new Demo(st, l);
d1.fork();
Demo d2 = new Demo(l + 1, end);
d2.fork();
return d1.join() + d2.join();
}
}
}
|
java
1
2
3
4
5
6
7
8
9
10
11
12
13
14
15
16
17
18
19
20
21
22
23
24
25
26
27
28
|
class TestDemo {
public static void main(String[] args) throws ExecutionException, InterruptedException {
long x = System.currentTimeMillis();
long sum = test2();
long x1 = System.currentTimeMillis();
System.out.println("sum" + sum + "time:" + (x1 - x));
}
public static long test() {
long sum = 0L;
for (long i = 0; i <= 40_0000_0000L; i++) sum += i;
return sum;
}
public static long test1() throws ExecutionException, InterruptedException {
ForkJoinPool pool = new ForkJoinPool();
Demo demo = new Demo(0L, 40_0000_0000L);
ForkJoinTask<Long> submit = pool.submit(demo);
return submit.get();
}
public static long test2() {
return LongStream.rangeClosed(0L, 40_0000_0000L).parallel().reduce(0, Long::sum);
}
}
|
结果:
数据量越大越能体现出区别
- for循环相加: time:3427
- ForkJoin: time:13310 /time:10786(更改了临界值) 和这个也有关系
- stream并行流计算(内部实现的是ForkJoin)time:7933
这里发现 for循环 要比其他的快 : 其实ForkJoin 和并行流都是并发的操作 根据CPU的性能决定的 但是就算你的任务拆分了 系统性能不支持 并行操作 / 或者说没有那么多资源满足你的操作 那么速度当然会比单线程的慢
并不是所有操作中并发操作一定效率高
JAVA异步通信
在多线程中 获取现成的返回值 或者返回状态(成功 失败 异常…) (AJAX的方式很像)
CompletableFuture几个方法
Future(父) new CompletableFuture()(子类);
runAsync(Runnable) 无返回值的异步调用
supplyAsync(Runnable) 有返回值
JMM
- 什么是JMM(java memory model)
JMM: java内存模型, 一种规则, 概念, 约定. 主要规定了线程和内存之间的一些关系 为了解决多线程和共享内存进行通信是的问题.
约定:
- 线程解锁前, 必须把共享变量==立即==刷新回主存
- 线程加锁前, 必须读取主存中的最新值到工作内存
- 线程 有工作内存, 主内存
JMM和JVM没有什么关系 但都提供了系统的可移植性
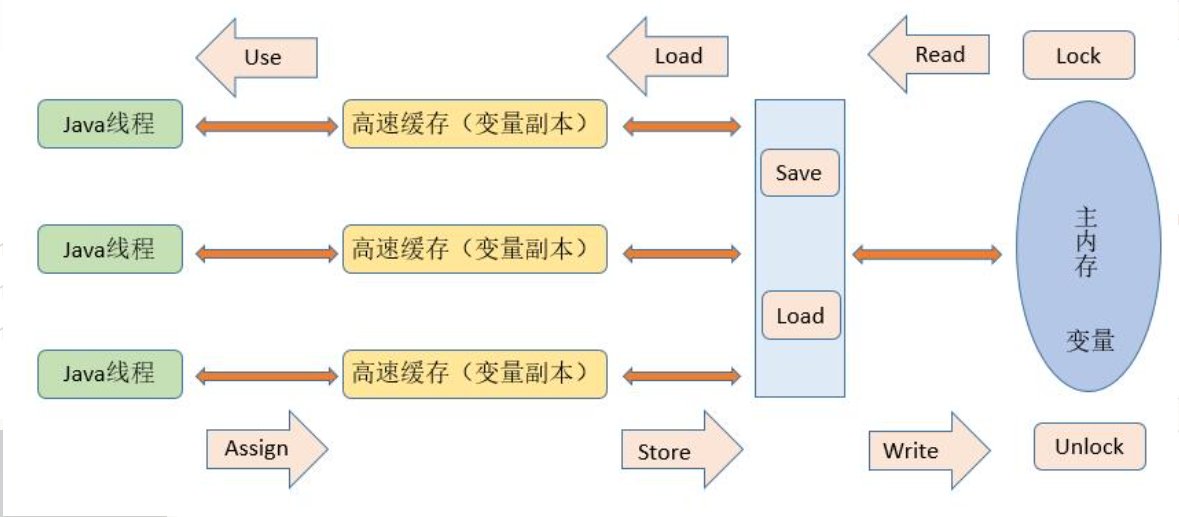
image.png
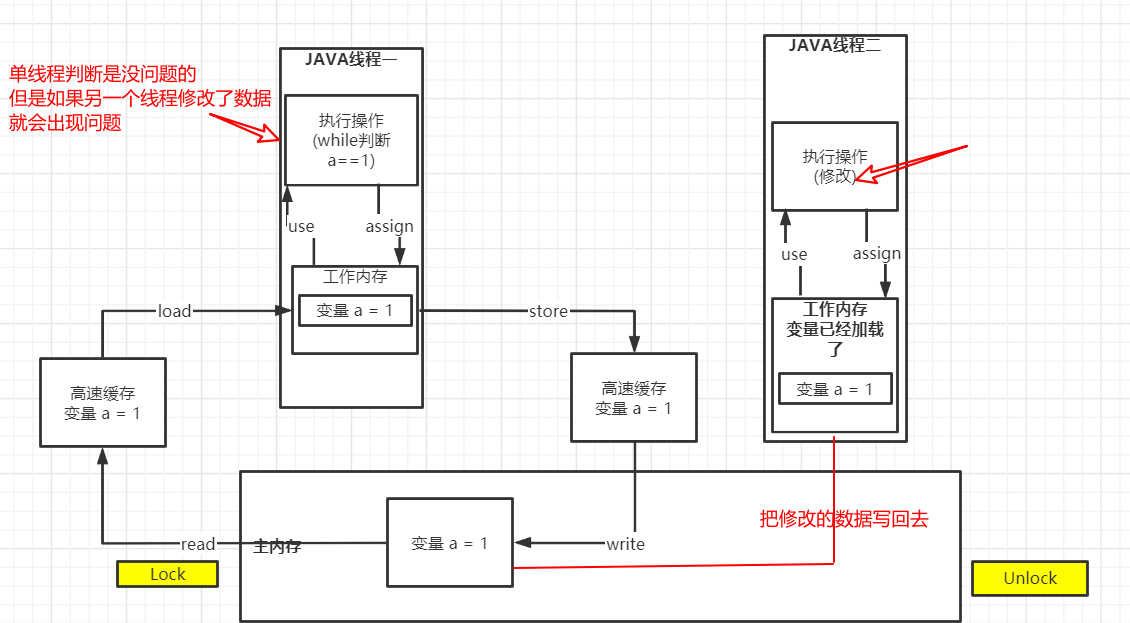
image.png
java
1
2
3
4
5
6
7
8
9
10
11
12
13
14
15
16
17
18
| static int num = 1;
public static void main(String[] args) {
new Thread(() -> {
while (num == 1) {
}
}).start();
try {
TimeUnit.SECONDS.sleep(1);
} catch (InterruptedException e) {
e.printStackTrace();
}
new Thread(() -> {
num = 0;
System.out.println(num);
}).start();
}
}
|
注: 并不是所有条件下都会出现问题 和系统环境有关系 但是加上volatile一定不会出现问题
volatile
Volatile是java虚拟机提供的轻量级的同步机制
- 保证了内存可见性
上面的多线程问题只要加上volatile关键字修饰变量就可以解决
1
| private volatile static int num = 1;
|
- 但是不保证原子性
使用JUC自带的原子类和操作 就可以保证原子性
3. 禁止了指令重排序
什么是指令重排
- 说白了就是 某些情况 计算机的CPU并不会哪找你写的程序的顺序去执行 他会自己重新优化排序
- 编译器 – 并行指令 – 内存系统 这些地方都会有重排的可能发生
volatile 避免指令重排
- 当有用Volatile关键字时 在执行时会加上内存屏障 防止指令的重排序
- 也保证了内存的可见性
CAS
什么是CAS(CompareAndSet): 比较并交换
举个例子 原子整形中 compareAndSet操作
java
1
2
3
4
5
| public static void main(String[] args) {
AtomicInteger atomicInteger = new AtomicInteger(20);
atomicInteger.compareAndSet(20, 21);
}
|
compareAndSet源码就会有unsafe类 这些原子操作都会用到这个类里面很多native的方法

image.png
自旋锁产生的ABA问题

image-20201003195829532
这就是ABA问题
- 循环时间太长开销也会变得很大: 加入pause 指令
- 延迟流水线执行指令(de-pipeline), 使cpu不会消耗过多的资源
- 可以避免退出循环的时候 因内存顺序冲突(Memory Order Violation) 引起的CPU流水线被清空
原子引用
乐观锁的思想
使用原子引用来解决这个问题
引入一个版本号的思想:
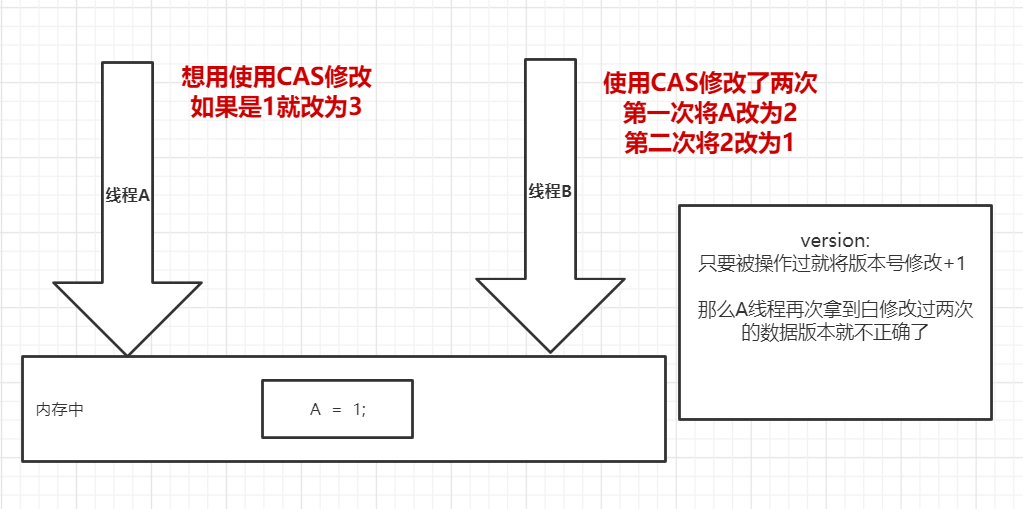
image.png
截取一部分
java
1
2
3
4
5
6
7
| AtomicStampedReference<String> atomicReference = new AtomicStampedReference<>("2222", 1);
new Thread(() -> {
int stamp = atomicReference.getStamp();
System.out.println("A-stamp: " + stamp);
atomicReference.compareAndSet("2222", "21", stamp, stamp + 1);
System.out.println(atomicReference.getReference());
}).start();
|
==注意:== 在Java的CAS底层实现中 比较两个值是否相等时用的是**==** 对于自动装箱的包装类(Integer等) 会出现不相等的问题 (自动装箱的缓存问题, 我就不细说了)
各种锁
锁的类型:
可重入锁(递归所)(synchronized和ReentrantLock):在执行对象中通用一把锁的方法不用再次获得锁(synchronized 和 Lock 都是可重入锁)
java
1
2
3
4
5
6
7
| synchronized 和 Lock区别
Lock锁 加锁解锁是成对的 获取道A的锁时 默认也获取到了B的锁
synchronized A(){B();}
synchronized B(){}
|
可中断锁(synchronized就不是可中断锁,而Lock是可中断锁):在等待获取锁过程中可中断
公平锁/非公平锁(ReentrantLock和ReentrantReadWriteLock): 按照先来后到排队 / 按等待获取锁的线程的等待时间进行获取,等待时间长的具有优先获取锁权利(默认都是非公平锁)
读写锁(ReadWriteLock和ReentrantReadWriteLock):对资源读取和写入的时候拆分为2部分处理,读的时候可以多线程一起读,写的时候必须同步地写
自旋锁 循环判断锁的状态
java
1
2
3
4
5
6
7
8
9
10
11
12
13
14
15
16
17
18
| public class SjsLock {
private AtomicReference<Thread> threadAtomicReference = new AtomicReference<>();
public void lock() {
Thread thread = Thread.currentThread();
System.out.println(thread.getName() + "==get LOCK ing...");
while (!threadAtomicReference.compareAndSet(null, thread)) {
System.out.println("锁被拿走了");
}
System.out.println(thread.getName() + "==GET success");
}
public void unlock() {
Thread thread = Thread.currentThread();
threadAtomicReference.compareAndSet(thread, null);
System.out.println(thread.getName() + "unlock");
}
}
|
死锁的排查
死锁四要素 https://www.cnblogs.com/bopo/p/9228834.html
JPS - l(查看进程) : https://blog.csdn.net/u013250071/article/details/80496623
jstack - 进程号(查看堆栈信息) 来排查:

 wechat
 alipay