Spring的AOP和IOC
Spring的IOC和AOP
[toc]
Spring介绍
Spring框架即以interface21*框架为基础,经过重新设计,并不断丰富其内涵,于*2004*年3月24日*,发布了1.0正式版。作者: [Rod Johnson]([[https://baike.baidu.com/item/Rod%20Johnson/1423612?fr=aladdin\]](https://baike.baidu.com/item/Rod Johnson/1423612?fr=aladdin])(https://baike.baidu.com/item/Rod Johnson/1423612?fr=aladdin))
==非入侵式, 轻量级框架 – 支持事务==
Spring(容器/代理类框架)
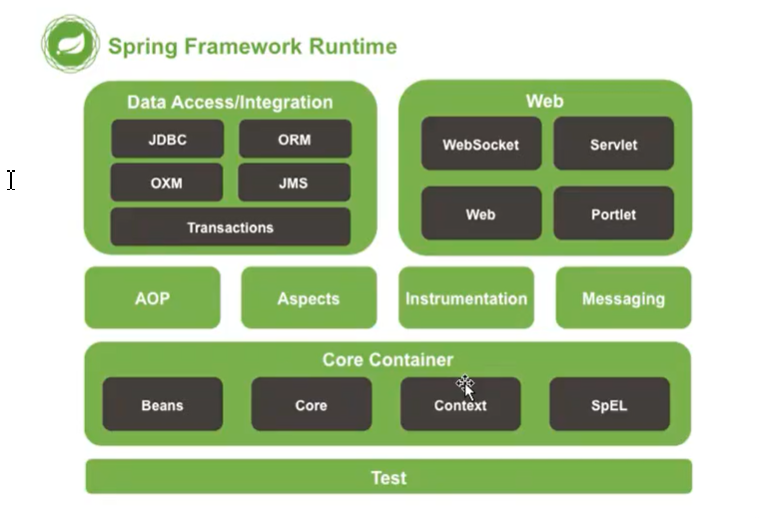
image.png
Spring七个模块
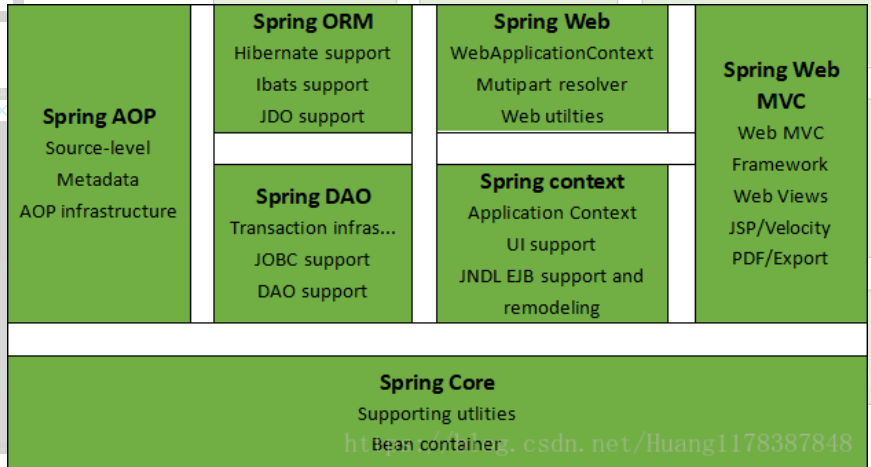
image.png
IOC(控制反转)
IOC – Inversion of Control
DI:依赖注入:实现方式
IOC:控制反转:==是一种设计思想==
基本概念
作用: 借助于“第三方”实现具有依赖关系的对象之间的解耦
理念: 应用组件不应该负责查找资源或者其他的对象之间的依赖关系, 配置这个关系的由容器负责, 查找资源从应用组件的代码中抽取出来(set); 交给容器
IOC控制:
谁控制谁: ioc容器控制了对象
控制什么
: 主要控制了外部资源的获取,创建
1
2
1. 对象由Spring创建、管理、装配
2. 控制的内容:控制对象的创建:传统的由程序本身去创建, 框架由Spring来创建和管理
IOC反转:(正转:程序自己创建对象)
- 反转: 由容器帮我们查找和注入了依赖对象, 对象只是被动地接受
- 反转了啥: 把依赖对象的获取方式反转了
- 对象A获得依赖对象B的过程,由主动行为变为了被动行为,控制权颠倒过来了,这就是“控制反转” 官方一点就是原来对象间的关系由程序猿的部分控制; 现在由容器框架来创建和管理
用一个简单例子理解一下为什么有IOC
java
1
2
3
4
5
6
7
8
9
10
11
12
13
14
// 在正常开发中 把传递的对象用set来实现动态化 大大降低了耦合度
public class UserDAOImpl implements UserDAO {
// 原先是 DAO层来创建对象和依赖关系 耦合度超高 一旦需要更改 就要改源码
// MyDataBase dao = new DataBase();
MyDataBase dao;
// 把需要的对象用来传递后 就是服务端传递对象
public void setDao(MyDataBase dao) {
this.dao = dao;
}
public void getName() {
System.out.println("通过" + dao.thisName() + "获取到了名字");
}
}
IOC实现
maven导入:
xml
1 | <dependency> |

image.png
- 传统的设计模式 由程序本身new出对象,主动去创建依赖,耦合度很高
- 当有了IOC容器后,在客户端类中不再主动去创建这些对象了
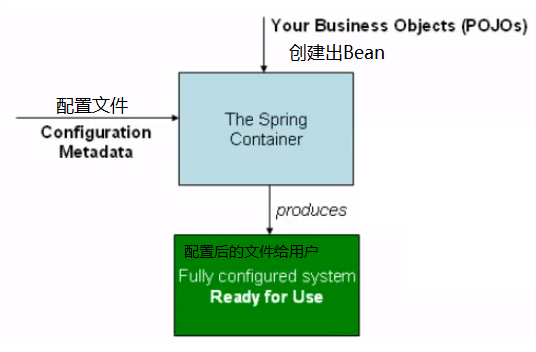
image.png
- pojo类
java
1 | public class Hello { |
配置文件
xml
1
2
3
4
5
6
7
8
9
10
11
12
13
14
<beans xmlns="http://www.springframework.org/schema/beans"
xmlns:xsi="http://www.w3.org/2001/XMLSchema-instance"
xsi:schemaLocation="http://www.springframework.org/schema/beans
https://www.springframework.org/schema/beans/spring-beans.xsd">
<!-- 在加载配置文件时 对象就已经new出
容器创建了对象
id 就像对象名
-->
<bean id="hello" class="com.sjs.Hello">
<property name="hello" value="Hello Spring"/>
</bean>
</beans>java
1
2
3
4
5
6
// 客户端加载配置文件 获取需要的Bean即可
public static void main(String[] args) {
ApplicationContext context = new ClassPathXmlApplicationContext("ApplicationContext.xml");// 可以加载多个XML文件
Hello hello = (Hello) context.getBean("hello");
System.out.println(hello.toString());
}在Spring中对象由容器创建, 管理, 装配
Spring的BeanFactory实现生成Bean
- Spring是一个大的Bean工厂, 负责Bean的创建和注入
- Bean创建流程
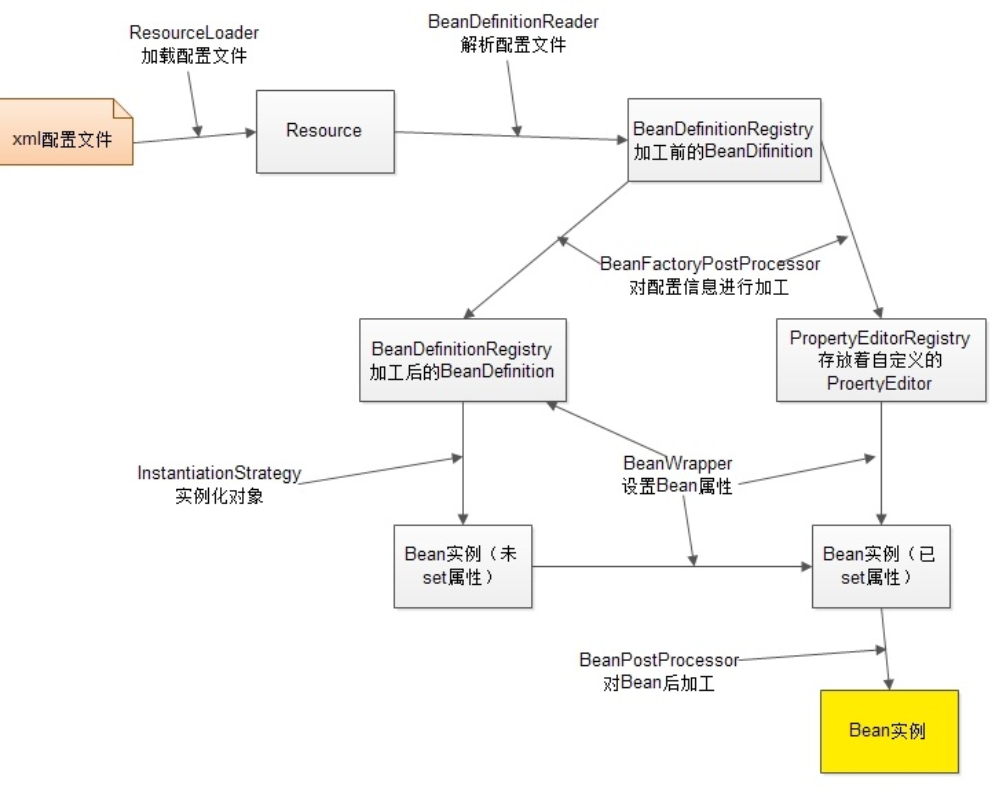
image.png
ResourceLoader加载配置文件
BeanDefinitionReader解析配置文件– 将 解析为BeanDefinition对象, 并保存到BeanDefinitionRegistry
利用后处理器BeanFactoryPostProcessor
对BeanDefinition加工处理
- 使用标签进行解析.将占位符替换为真实值
- 对所有的BeanDefinition扫描,用反射机制找出所有的属性编辑器的Bean,注册到PropertyEditorRegistry
从BeanDefinitionRegistry中取出BeanDefinition, 调用InstantiationStrategy进行实例化
实例化时, 利用BeanWrapper对Bean设置属性
利用后处理器BeanFactoryPostProcessor对完成的Bean进行加工
Bean的生命周期
ioc启动先产生一个BeanDedinition 后 有可能会触发实例化
如果是原型模式在getBean时会实例化
单例模式在初始化实例后回到容器中寻找
- 实例化bean对象
- 设置属性(DI注入)
- 调用Bean的初始化方法
- 使用Bean
- 容器关闭前销毁Bean
java
1 | //Bean的销毁方法 |
BeanFactory与ApplicationContext是干什么的,区别?
| BeanFactory | ApplicationContext |
|---|---|
| 都是容器 | 都是容器 |
| 顶层-基础接口,实现了基础功能 | 容器的高级形态,增加了特性,顶级父类是BeanFactory |
FactoryBean是一个Bean,用于生产修饰其他的Bean实例,典型的是AOP代理类
Spring的IOC创建对象的方式
无参构造:
- 上慢的例子就是
有参构造(3中方式)
xml
1
2
3
4
5
6
7
8<bean id="hello" class="com.sjs.Hello">
<!-- 通过构造器参数名字获取 -->
<constructor-arg name="name" value="Hello Spring"></constructor-arg>
<!--通过构造器参数索引-->
<constructor-arg index="0" value="Hello Spring"></constructor-arg>
<!-- 通过类型 -->
<constructor-arg type="java.lang.String" value="Hello Spring"></constructor-arg>
</bean>工厂方式创建
- 静态工厂
java
1
2
3
4
5
6// 工厂类
public class MyFactory {
public static Hello getInstance(String name) {
return new Hello(name);
}
}xml
1
2
3
4
5配置文件
<!-- 静态工厂方法-->
<bean id="factory" class="com.sjs.MyFactory" factory-method="getInstance">
<constructor-arg name="name" value="hello Factory"></constructor-arg>
</bean>- 动态工厂
java
1
2
3
4
5
6// 工厂类
public class MyFactory {
public Hello getInstance(String name) {
return new Hello(name);
}
}xml
1
2
3
4
5
6
7<!-- 动态工厂方法 与静态比少了static -->
<!--注册工厂-->
<bean id="factory" class="com.sjs.MyFactory"/>
<!--对应工厂的对应方法创建对应的对象-->
<bean id="hello" factory-bean="factory" factory-method="getInstance">
<constructor-arg name="name" value="Hello Dynamic Factory"></constructor-arg>
</bean>
DI - 依赖注入
构造器注入
前面有的就是构造器
set注入
- 依赖注入
- 依赖: bean对象的创建依赖容器
- 注入: bean的所有属性由容器注入
注入配置
- 所有类型
xml
1 | <bean id="address" class="com.sjs.Address"> |
拓展方式注入
- c/p命名方式注入
- p标签就是和 property相同功能
xml
1 | xmlns:p="http://www.springframework.org/schema/p" |
- 所以c标签就是和构造器参数constructor-arg相同功能配置在标签内
xml
1 | xmlns:c="http://www.springframework.org/schema/c" |
配置:
xml
1 | <bean id="people" class="com.sjs.People" p:name="haha" p:address-ref="address"> |
Spring配置
xml
1 | Spring核心配置头 |
- 引入配置文件 – 将多个配置文件引入合并到一个文件中
xml
1 | <import resource="ApplicationContext1.xml"></import> |
- Bean配置
xml
1 | <!-- id对象名字 class权限定名 name 别名配置(空格/,/;)当分隔符 --> |
Bean作用区域
官方文档有六个:
| Scope | Description |
|---|---|
| singleton(单例) | (Default) Scopes a single bean definition to a single object instance for each Spring IoC container. |
| prototype(原型) | Scopes a single bean definition to any number of object instances. |
| request | Scopes a single bean definition to the lifecycle of a single HTTP request. That is, each HTTP request has its own instance of a bean created off the back of a single bean definition. Only valid in the context of a web-aware Spring ApplicationContext. |
| session | Scopes a single bean definition to the lifecycle of an HTTP Session. Only valid in the context of a web-aware Spring ApplicationContext. |
| application | Scopes a single bean definition to the lifecycle of a ServletContext. Only valid in the context of a web-aware Spring ApplicationContext. |
| websocket | Scopes a single bean definition to the lifecycle of a WebSocket. Only valid in the context of a web-aware Spring ApplicationContext. |
后面四个在web中才会用到
- 单例Singleton

image.png
xml
1 | <bean id="accountService" class="com.something.DefaultAccountService" scope="singleton"/> |
- 原型
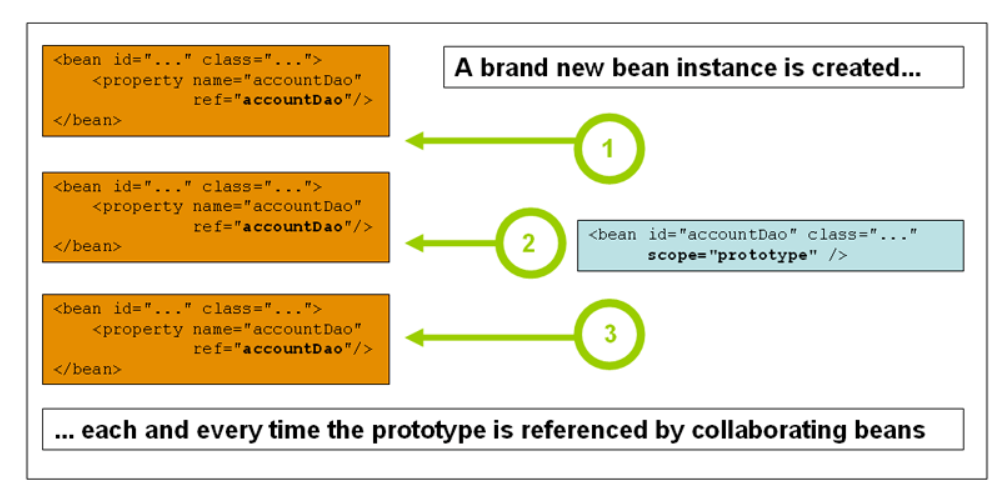
image.png
xml
1 | <bean id="accountService" class="com.something.DefaultAccountService" scope="prototype"/> |
Bean自动装配
- byName和byType
xml
1 | <!--写两个类: 人类拥有猫 --> |
Spring注解
The introduction of annotation-based configuration raised the question of whether this approach is “better” than XML.(官方推荐使用注解)
- 注解开发
- 1.带入约束
- ==2.只需要多加一个 context:annotation-config/==
xml
1 |
|
@Autowired
参数(required = “false 表示可以为null”) 选择性填写
先通过byName方式获取 如果没有则通过 byType (如果有两个相同的注入配置 byName会异常)
直接加到对应的属性或者set方法上
如果自动装配的属性在IOC(Spring)容器中存在, 且名字对应 就可以不写set方法(用反射机制获取对应的属性结构)
@Qualifier(value = “参数名字”) 配置一个别名
java
1
2
3
private Cat cat;@Resource(是java自带的)
参数可以配置名字(name= “参数名字”)
先通过byName方式获取 如果没有则通过 byType
注解开发
一定要引入aop包 和配置自动扫描
xml
2
3
<context:component-scan base-package="com.sjs"/>
<context:annotation-config/>
bean
@Component注解表示注入到Spring中 相当于
<bean id="" name=""/>@Component的衍生注解, 在web开发中,的MVC三层架构
- DAO层: @Repository
- Controller层: @Controller
- Service层: @Service
注解功能相同
属性注入
java
1 |
|
自动装配
@Autowired
参数(required = “false 表示可以为null”) 选择性填写
先通过byName方式获取 如果没有则通过 byType (如果有两个相同的注入配置 byName会异常)
直接加到对应的属性或者set方法上
如果自动装配的属性在IOC(Spring)容器中存在, 且名字对应 就可以不写set方法(用反射机制获取对应的属性结构)
@Qualifier(value = “参数名字”) 配置一个别名
java
1
2
3
private Cat cat;@Resource(是java自带的)
参数可以配置名字(name= “参数名字”)
先通过byName方式获取 如果没有则通过 byType
作用域
java
1 | // 单例 原型 ... |
- 小结
Xml与注解:
- xml方便维护,比较万能 适用任何场合
- 注解 针对自己的类, 维护复杂
实践
- xml用来管理bean
- 注解只负责完成注入
- 在使用过程中,只要注意一个问题: 开启注解支持配置(配置文件 和 扫描包)
javaConfig实现配置
- 由于有javaConfig配置可以实现不用配置文件, 全交给JAVA来做!
- javaConfig是Spring的一个子项目, 在Spring4之后, 成为了一个核心功能(获取ConfigContext)

ApplicationContext.png
- 测试例子
配置类:可以完全替代Bean.xml
java
1 | // 这个类回由Spring容器托管 @Configuration的实现有@Component |
PO类
java
1 | // User类 |
测试类
java
1 | public static void main(String[] args) { |
结果:
hahaha
猫来啦!
Cat{name=’mao’}
User{name=’sjs’}
AOP代理-面向切面
AOP -Aspect Oriented Programming
了解Spring的AOP实现不得不说到 java的反射机制和 动态代理模式
- 基本概念
- 通过预编译方式和运行期动态代理实现程序功能的统一维护的一种技术.
- AOP是OOP的延续, 是软件开发的热点, 也是SPring框架的重要内容. 函数式编程的衍生泛型. ;利用AOP可以对业务逻辑各个部门进行隔离,是逻辑间耦合度降低, 提高重用性,提高开发效率
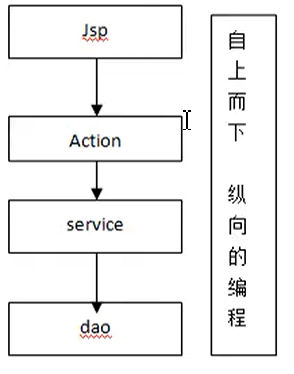
正常编程
image.png
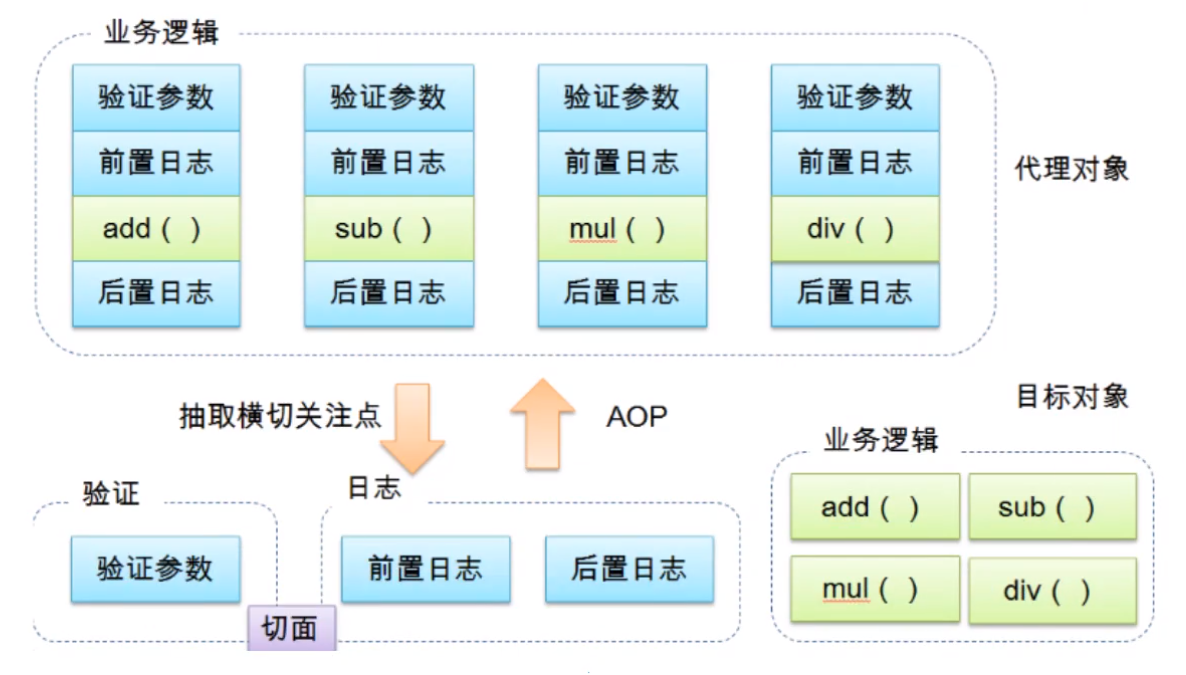
面向切面: 在一个功能(类)中切入另一个功能
image.png
image.png
Spring中AOP的作用
**提供声明式服务: ** 允许用户自定义切面
- 横切关注点: 跨越应用程序多个模块的方法或功能. – 与业务逻辑无关 但是我们要关注的部分– 日志, 安全, 缓存….
- 切面(ASPECT): 横切关注点 被模块化的特殊对象 – 是一个类(Log)
- 通知(Advice): 切面必须要完成的工作, 即, 他是类中的一个方法(日志方法)
- 目标(Target): 被通知对象.
- 代理(Proxy): 向目标对象应用通知后创建的对象
- 切入点(PointCut): 切面通知 执行的”地点”的定义
- 连接点(JoinPoint): 与切入点匹配的执行点
image-20200627195527701
AOP重要性:
aop将公共业务(日志,安全)和领域业务结合。公共业务可以重复使用,程序猿更专注与领域业务 本质动态代理
实现方式
反射机制 需要了解一下
- 哪些方法不能被AOP增强
- 基于JDK代理,除public外的其他所有方法,包括public static也不能被增强
- 基于CGLIB代理,由于其通过生成目标类子类的方式来增强,因此不能被子类继承的方法都不能被增强,private、static、final 方法
使用Spring原生接口方式(和JDK动态代理模式很像)
核心配置文件
xml
1
2
3
4
5
6
7
8
9<bean id="userService" class="com.SpringAOP.UserServiceImpl"></bean> // 被切入的业务
<bean id="log" class="com.SpringAOP.MyLog"></bean> // 切入的业务
<!-- 配置的(..) 括号是方法 .. 任意参数-->
<aop:config>
<!-- 切入点 expression: (返回类型 切入的位置(包.类.方法(参数类型)))-->
<aop:pointcut id="pointcut" expression="execution(* com.SpringAOP.UserServiceImpl.*(..))"></aop:pointcut>
<!-- 哪个类切入哪个切入点(log) -->
<aop:advisor advice-ref="log" pointcut-ref="pointcut"></aop:advisor>
</aop:config>日志类
java
1 | public class MyLog implements MethodBeforeAdvice { |
- 载入配置文件
java
1 | ApplicationContext context = new ClassPathXmlApplicationContext("aopConfig.xml"); // 加载xml方式 |
- Spring的五种Advice
| 通知类型 | 连接点 | 接口 |
|---|---|---|
| 前置通知 | 方法前 | aop.MethodBeforeAdvice |
| 后置通知 | 方法后 | aop.AfterReturnAdvice |
| 环绕通知 | 方法前后 | intercept.MethodInterceptor |
| 异常抛出通知 | 方法抛出异常 | aop.ThrowsAdvice |
| 引介通知 | 类中增加新的方法属性 | aop.IntroductionInterceptor |
使用自定义类实现
- 先自定义一个类
java
1 | public class MyDiyLog { // 自定义类当做切面 |
- 配置文件
xml
1 | <!-- Spring 注入Bean --> |
使用注解方式实现
- 配置文件:
xml
1 | <!-- 三: 注解 --> |
- 注解部分
java
1 | public class MyLogAnnotation { |
其他的相比第一种没有变化
六种增强类型
- @Before 前置增强,相当于BeforeAdvice
- @AfterReturning 后置增强,相当于AfterReturningAdvice
- @Around 环绕增强,相当于MethodInterceptor
- @AfterThrowing 抛出增强,相当于ThrowsAdvice
- @AfterFinal增强,不管抛出异常还是正常退出,都会执行,没有对应的增强接口,一般用于释放资源
- @DeclareParents 引介增强,相当于IntroductionInterceptor
加一个MVC的
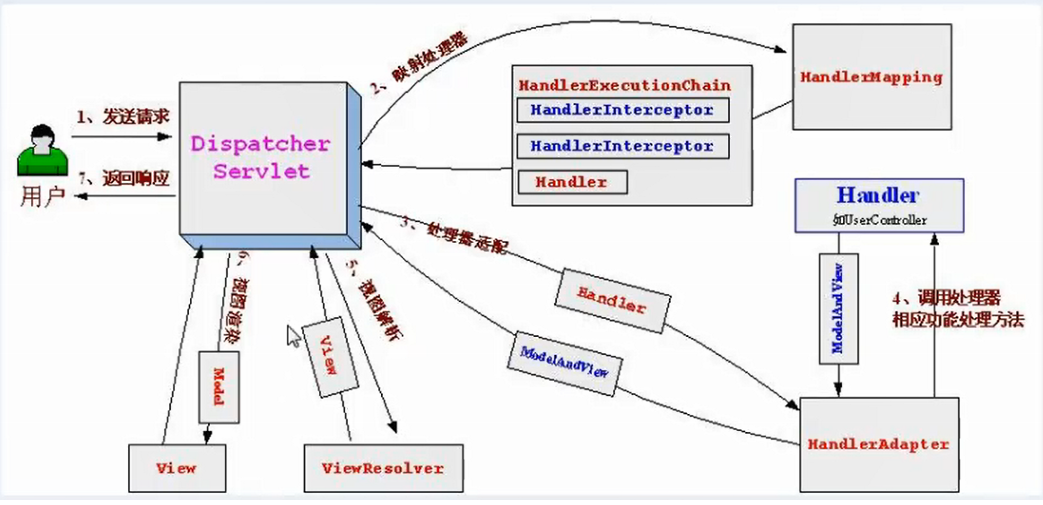
mvc工作原理
- 客户端请求到DispatcherServlet
- DispatcherServlet根据请求地址查询映射处理器HandleMapping,获取Handler
- 请求HandlerAdapter执行Handler
- 执行相应的Controller方法,执行完毕返回ModelAndView
- 通过ViewResolver解析视图,返回View
- 渲染视图,将Model数据转换为Response响应
- 将结果返回给客户端
1 | 2,3 两步都在DispatcherServlet -> doDispatch中进行处理 |
Spring MVC 架构 | 与原生Servlet区别 | 请求处理流程
- 原生的一个请求对应一个servlet 框架(SpringMVC框架 简写) 由前端控制器去寻找对应的Controller
- 框架封装了一些数据

